No matter if you’ve already purchased our amazing template library or are just thinking about it, you may be wondering how to best utilize these template sets for your e-learning. So, how about we take a look at integrating templates in your e-learning development step by step?
Select the right templates
If you’ve taken a look at our template library, you’ve seen that there are many options to choose from. So, how do you know what you need? My suggestion would be to focus on the overall style of the template set and the selection of layouts that it offers.

In terms of style, I’m referring to the general look and feel of the templates. Think about the content of the training – what design would complement it? Does it need to be clean and formal, or does it demand a more fun, free-spirited design? Remember that these are templates – this means that changes can be made to the color palette and any other elements, if necessary. However, the overall look should work for your content, so that you don’t end up with an extremely joyful and vibrant course on anti-corruption policies.

Moving on to layouts. You might not have a complete e-learning script on your hands, but you probably have an idea of what the content is going to be like. Will there be a need to show many images, screenshots, charts or any other visuals? Will it be text heavy? Will there be procedures or chronological sequences? Will you have knowledge checks or a test? Questions like this will help you recognize features that are essential for your e-learning.
Get acquainted with the layouts
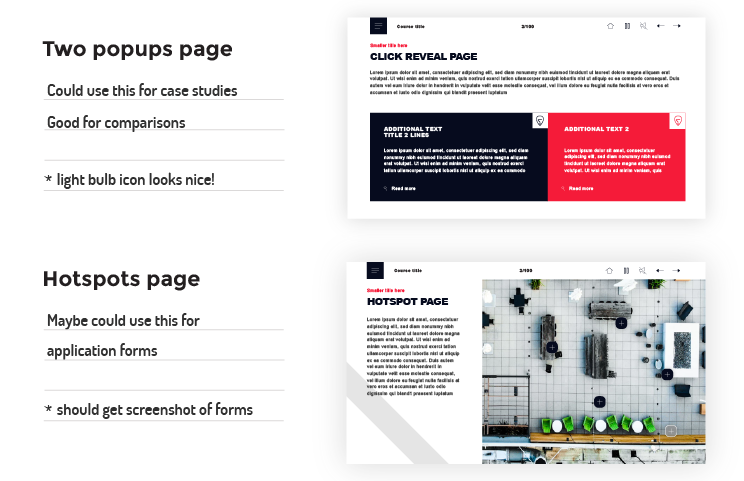
Once you have a winner (or at least a reasonable number of front-runners), you should really dive into the layouts and what they can be used for. One way to do this could be to make a list of all templates in the set, so that you have something to refer to when you try to find the best layouts for your content. You can format this in any way that’s comfortable for you – consider adding screenshots of the pages or maybe small notes on what each layout offers (space for text and/or images, types of interactions, etc.).
Storyboarding
When you reach the point where you have content for the course and a template set to use, you can merge them together in a detailed storyboard. This means that you will select the best template for each part of the content. You may need to make minor adjustments, such as splitting the text up into sections, adding titles and so on. Although templates shouldn’t dictate what your content is like, they can actually be really helpful in adding some structure and making the content easier to perceive.
As to media, it’s up to you whether you work it into the storyboard at this stage. My suggestion would be that, if you’re not completely sure about certain layouts, wait until you see if they’re right for the content before spending your time on looking for (or even producing) images, icons or videos.

Guidelines
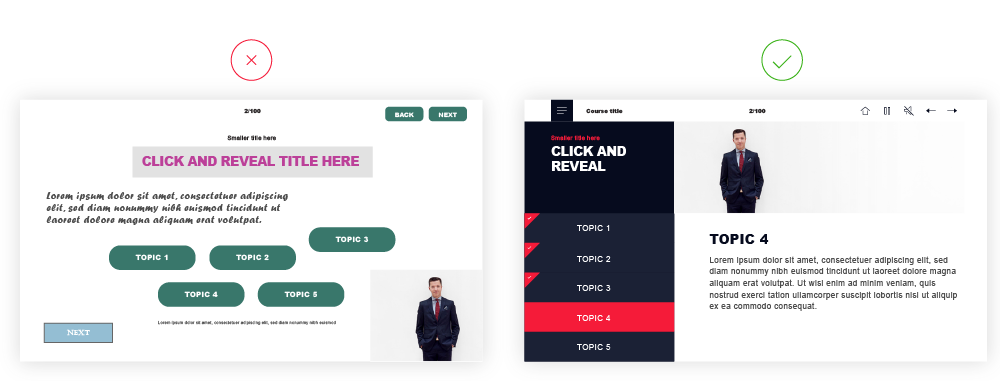
When it comes to building the actual course, I suggest that you set some strict guidelines for yourself before you even begin. Force yourself to be consistent in your choice of colors for headers, body text, buttons and other types of elements. Decide on the optimal font and font size for titles, subtitles and normal text. If you like how everything looks in the templates, make note of what fonts, colors, etc. are used and stick to the same principles throughout. Keeping the formatting consistent throughout the course is a good practice that will make your training look neat and professional.
Something’s not right
Despite your best efforts, it can happen that once you start building the course, you will find that some pages don’t look as you had envisioned. A common example – a text block doesn’t fit in the designated space. Of course, if it’s a question of a few words, you might simply try to shorten the text just enough to make it fit. However, you shouldn’t compromise the value of your content to make a layout work. Similarly, you shouldn’t diverge from design guidelines and change the font size. Sometimes, it may be better to try a different layout.

Depending on your proficiency level in the authoring tool you’re using, you may also consider making some adjustments. For example, you could remove a nice-to-have image to leave more space for the text or switch from a half-screen pop-up to a full-screen one.
Final touches
After the course has been built, test it properly and fix any inconsistencies that you come across. Even if everything looks fine in the authoring tool, definitely check if nothing changes once you publish the course. If your training is intended for viewing on tablets or phones, make sure that the training looks and works well on different screens. Once everything is polished, you are good to go!

What did I gain?
So, what did you gain by using templates instead of building the course from scratch? First and foremost, you saved time (and time is money, as we all know). Even if the authoring tool is good and intuitive, building a page from nothing can be time-consuming, especially if you’re new to this. With templates, you only had to insert your content into pre-built layouts. Secondly, you created e-learning that looks professional, modern and well-designed with comparatively little effort. Finally, you learned a lot about building e-learning courses – every time you use templates, you become more proficient in your authoring tool as well as instructional design as such.
Explore all e-learning templates
Explore hundreds of course starters, games, click & reveal, info pages and test templates. Click the button below and see all of our e-learning templates!
I’ve been looking for an easy solution to a custom progress bar. (no scrubbing during the use of courseware) Any assistance would surely be appreciated.
I forgot to add that it is in Captivate 2019.
Sounds like you could use variables that would allow you to change a custom shape or shapes designed as a progress bar, based on how much of the content has been visited in your course. You can learn more about how to work with variables in our Captivate Training Program – https://fastercourse.com/training/captivate/.